

This is a lovely dinner roll for you to put together easily. It is tender and light and best of all, you won’t be in the kitchen all day!
Reflections on Martha
You know the story in the Bible about Mary and Martha…the one where Martha is cooking like crazy trying to get dinner on the table and Mary is sitting and chatting with Jesus? Martha gets frustrated because Mary isn’t helping her. She tries to get Jesus to tell Mary to stop talking so much and help out with the cooking and the serving. Jesus replies, “Martha, Martha, thou art careful (worried) and troubled about many things: But one thing is needful: and Mary hath chosen that good part, which shall not be taken away from her.”
Oh shoot. Martha was so busy and so worried about getting everyone’s needs met that she wasn’t taking the time to relax and visit with her guests, especially with Jesus. And Mary…she ought to have helped out with things, too. That way, everyone could have enjoyed the day.
Sometimes, though, I guess that the time you spend with people is far more important than the food that you feed them. Especially if Jesus is visiting. Wouldn’t you want to spend more time talking to him than feeding him? Which would you rather say…”I fed Jesus a fabulous meal and waited on him hand and foot” or “Jesus dropped by today and we ate salad and rolls and talked a lot.”
And Where Do I Fit In?
I’m sort of like Martha, especially on Sundays when family comes to visit. I want to make a nice dinner, set a pretty table, and create a happy atmosphere Like I said, I want to do those things, but I’m not usually very successful. I tend to wear myself out with the working and the worry and I definitely don’t have much of Jesus on my mind. But Sunday dinner is supposed to be special because, well, its SUNDAY and everybody knows that on Sunday you’re supposed to make a nice dinner, set a pretty table, and create a happy atmosphere. You, the chief cook and bottle washer, are supposed to be Martha on Sunday. And make rolls. Everybody knows that it ain’t Sunday dinner unless you have rolls.
Well.
Choosing “That Good Part”
How do you “choose that good part” and get dinner on the table, including the homemade rolls? First, redefine Sunday dinner. Make it simple. I’m going to start doing things more simply. How about tossing a ham in the oven, making a salad, and, just to let your family know that you still care about them, make these delicious rolls. The rolls would be great with slices of ham on them with a little mustard. You’d have a complete meal: meat, bread, and the salad will provide your vegetables. Everyone will get fed, including you, and you’ll have plenty of time to visit and talk and feel like Jesus is close by.
The Rolls
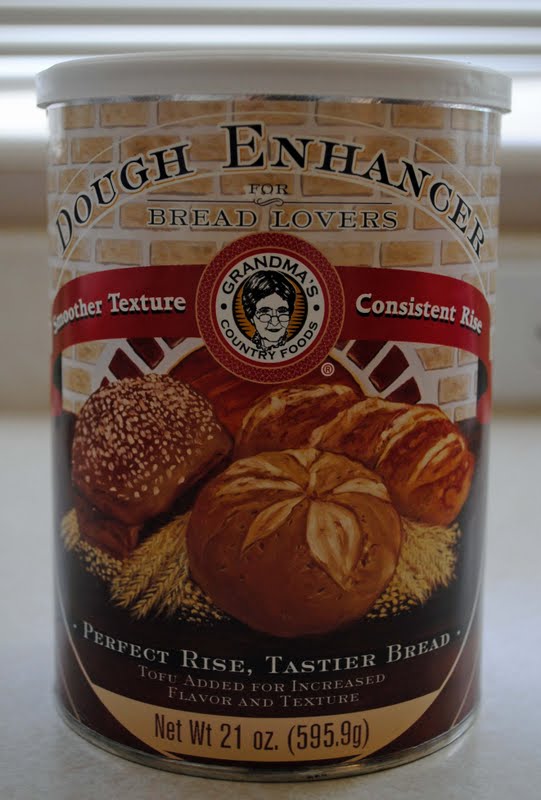
Note: I use a dough enhancer in these rolls. Dough enhancers improve texture and rise in breads and rolls and add a little ‘extra something’ to the flavor. It’s the ‘mmmmmm’ factor. The brand that I use is by Grandma’s Country Foods and contains whey, tofu, soy lecithin, sea salt, yeast, vitamin C, and a little cornstarch. The grocery stores in my area sell dough enhancers in the baking isle. They are often a ‘top shelf’ item and I generally find them near the flour. I am not promoting Grandma’s brand; I am simply saying that it is the one that I use.

“Sunday Best” Rolls
Ingredients
- 1 cup warm water, divided
- 1 tablespoon instant yeast
- 1/2 cup butter, divided
- 1/4 cup + 1/2 teaspoon sugar
- 2 large eggs
- 1 teaspoon salt
- 1 tablespoon dough enhancer
- 1/4 cup powdered milk
- 3 1/2-4 cups white bread flour
Instructions
- Dissolve yeast and 1/2 teaspoon of sugar in 1/2 cup warm water.
- While the yeast is proofing, melt 4 tablespoons butter.
- Add the other 1/2 cup of warm water, 4 tablespoons melted butter, sugar, and eggs to the mixing bowl of a heavy duty electric mixer such as a Bosch or Kitchenaid. When the yeast has doubled (only takes a few minutes) add it to the bowl. With the paddle attachment in place, mix on low speed just until the ingredients are combined.
- Add 2 cups flour, powdered milk, dough enhancer, and salt. Mix on a medium speed for 7-10 minutes. Turn off mixer and let mixture rest for 10 minutes.
- Change to the dough hook attachment. Add 1 more cup flour and mix on medium speed until ingredients are well incorporated. With mixer running, add more flour, 1/2 cup at a time just until dough cleans side of bowl. Allow the machine to knead the dough for 8-10 minutes until the dough is very smooth and elastic. Or, if the mixer you are using cannot handle the extended kneading, turn dough out onto a lightly floured counter top and knead by hand until the dough is smooth and elastic.
- Turn off the mixer and let the dough rest in the bowl, covered, for 10 minutes. After the dough has rested, turn the mixer back on for a few seconds to deflate the dough.
- Preheat the oven to 375-degrees F. Lightly butter a 9" x 13" metal baking pan; set aside. Melt the remaining 1/4 cup butter and place in a small bowl.
- Divide dough into 20 equal size pieces. Form each piece into a ball. Dip each dough ball into the melted butter and place in pan; 4 rolls across and 5 down.
- Cover the pan loosely with plastic wrap or a moistened kitchen towel and set the rolls in a warm place to rise. It can take up to an hour for the rolls to rise; sometimes only 30-45 minutes, depending on how happy the yeast is that day.
- Once the rolls have nearly doubled in bulk, remove the plastic wrap and bake the rolls at 375-degrees until they are golden brown, 15- 20 minutes. You can brush a little more butter on them, if you want to. It makes them extra pretty.


They look so fluffy and delicious! they caught my eye on tastykitchen, I’m making them as soon as possible! 🙂 Thank you for sharing your recipe!
I hope that they go well for you, Maggie. The biggest two pieces of advice that I can give you is 1) make sure that your yeast is nice and active before you proceed with the rest of the recipe and, 2) pay special attention when adding the flour. Too much flour will make the rolls dense; too little will give a flatter roll. All in all, though, if you have to err in one direction or the other, I’d choose too little flour! The more you work with making yeast doughs, the better you will get at it.
Hello, I’m trying your roll recipe today. I have a quick question. The dough started to clean the bowl after I added the first 1/2 c. Flour. Soon after it started rolling around my Kitchen Aid causing the top to bobble even in the locked position. The mixer got really hot, so I’ve decided to knead it by hand. How long should I knead it, how smooth should it be? Should it be really stretchy? What should I look for to tell if I’m dine kneading? Thanks in advance.
Hi Kimmie…I realize that this answer is too late, but I didn’t get home from work until almost 11:00 tonight. Tough day, long shift.
From what you told me about the process you used to make the dough, I suspect that much of the kneading had already been handled by your mixer. However, I have written lots of information below for you to try and answer your questions.
With hand kneading, the dough texture will indicate when enough kneading has been done. The dough should be soft, but workable with the end result being fairly smooth and elastic. It will take on a satiny appearance and have very fine bubbles just under its surface.
The most frequent mistake made when kneading by hand is incorporating too much flour. Work on a floured surface and flour your hands as needed to keep the dough from sticking to your hands. You might even try a touch of cooking spray on your hands instead of flour. Often people keep adding flour to the dough in an attempt to keep it from sticking to their hands. This will lead to a heavy dough.
You asked how stretchy the dough should be. The dough will be pliable without being sticky. It should stretch fairly easily without breaking. For a good tutorial on making bread, click on the “100% Whole Wheat Bread” picture in the side bar. There is a particular picture where I am pulling on the bread dough, demonstrating its stretchability. I give an explanation below the picture about how it will look and feel. Although the recipe is for bread, the same principles apply to rolls.
If making this roll dough by hand, I recommend that you let the dough rise after kneading. Rising will give the dough a better texture. Simply put the dough in an oiled bowl, turn dough over once so that it picks up some of the oil on its surface, and cover with plastic wrap or a damp cloth. Put the bowl in a warm place to allow the dough to rise until approximately double in size. I often use a warmed oven for this to speed things along. I turn on the oven and let it get softly warm–maybe around 120-130 degrees, then turn it off and put the bowl dough inside. With the type of yeast that I use (SAF instant yeast) and the warm oven, the dough usually doubles in under an hour.
After it has risen, punch the dough down, let it rest 5-10 minutes and form your rolls. Proceed with the directions as stated in the recipe.
I hope that all has turned out well…or will turn out well the next time you make these rolls. And here is my very best tip: warm rolls from the oven, whether the dough is perfect or not, taste spectacular!