

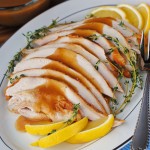
It never ceases to amaze me how the simplest foods can have such profound flavors. Thyme and lemon freshens the taste of turkey, making it the center of attraction on a Spring dinner menu…maybe for a surprise addition to your Easter menu. Dedicated to ham on Easter? Okay. I understand. I favor ham on Easter, too, mostly because it goes great with Potato Casserole. BUT, if you want something new for dinner (Spring is all about new, right?) then I most humbly offer this recipe for a truly excellent non-Thanksgiving turkey.
The idea for this recipe just popped into my head while I was sitting in Church a couple of weeks ago. I probably ought to have been focusing more on Church than I was on dinner, but I couldn’t help myself. Maybe my brain was in a very relaxed state so that ideas just flowed naturally. I’m sure you know what I mean. Pretty much everyone gets one of those random “eureka” moments when you least expect it.
My eureka moment came complete with pictures in my head and a set of instructions for cooking the turkey. Crazy.

All of us that were here for Sunday dinner had the same reaction when we took our first bite of the turkey with the lemon sauce. Actually, it was more of a lemon gravy and it was delicious. Fresh and light and irresistible.
I felt kind of guilty (remember, I am a very guilt-based person) that there could be so much flavor with such minimal effort on my part. Just to make certain that it wasn’t beginner’s luck that made the turkey taste so good, I made another turkey for dinner last night. The second turkey turned out just as great as the first turkey. Everything about it says Spring.

Roasted Lemon-Thyme Turkey with Lemon Sauce
Ingredients
- 2 large onions
- 1-½ lemons, sliced
- 4 tablespoons butter, divided
- 4 sprigs fresh thyme, with multiple stems per sprig
- 1 whole 10 - 12 pound turkey
- salt and pepper, to taste
For the Gravy
- 1 cup chicken stock, or as needed
- reserved cooking juices from turkey
- ½ lemon
- 1 sprig fresh thyme, optional
- 3 tablespoons cornstarch, dissolved in a bit of stock or water
Instructions
- Preheat oven to 350-degrees F. If your oven has a convection roast feature, only set it for 325-degrees F.
- Peel the onions and halve lengthwise. Slice the halves lengthwise into four or five thick slices. Place the onion slices in the center of the baking pan.
- Slice 1 1/2 lemons crosswise into 10-15 slices. (Set the remaining lemon half aside for use later in the recipe.) Place half of the slices on top of the onions. Dot the onions and lemon slices with two tablespoons of butter.
- Rinse the thyme under cool water; pat dry with paper towels. Separate the thyme sprigs into individual stems. Scatter half of the stems over the lemon slices and onions. Set aside the remaining individual thyme stems.
- Remove the neck and giblets from the cavity of the turkey. With a sharp pair of kitchen shears, butterfly the turkey by cutting vertically along each side of the back bone to separate it from the turkey. Discard the backbone or save for another use. Open the turkey and rinse inside and out with cool running water.
- In the sink or on a flat surface, spread the turkey and place it with the inside facing down. Press firmly on the breast bone until you feel/hear a snap. This will help the turkey to remain in a more flattened position in the baking pan.
- Pat the turkey dry with paper towels. Sprinkle the "cavity" side of the turkey with salt and pepper.
- Turn the turkey over, breast side up. Spread turkey and place it cavity side down over the onions, lemon slices, and thyme. Rub the skin with the two remaining tablespoons of softened butter. Sprinkle with salt and pepper.
- Place the remaining lemon slices randomly on top of the turkey. Scatter the remaining single stems of thyme on top of the turkey and lemon slices.
- Bake, uncovered, until a thermometer placed in the thickest part of the turkey thigh, and not resting against bone, reaches an internal temperature of 165-degrees F. This will take approximately 1 hour 45 minutes to 2 hours. It is important to monitor the temperature of the turkey, particularly during the final 30 - 45 minutes of roasting. For a most moist and tender turkey, do not overcook. Remove from oven and allow to sit 10-15 minutes before carving.
- Remove turkey from baking pan and set on a cutting board. Remove lemon slices and thyme sprigs from the turkey and the pan. Reserve onions, if desired, for serving. Cover to keep warm. RESERVE the cooking juices in the pan to make the lemon gravy!
For the lemon sauce or gravy:
- Add enough chicken stock to the reserved juices to make 2 cups. Pour into a 2 quart sauce pot.
- Squeeze the juice from the remaining lemon half and add the juice to the reserved turkey juices. If you have another thyme sprig, toss it into the pot as well. Bring to a boil over medium heat.
- Whisk together some of the chicken stock or water and the corn starch to make a smooth slurry. Add the slurry to the boiling juices, whisking constantly. Allow the gravy to return to a boil. Cook, stirring as needed until the gravy reaches the desired thickness. Thin, if necessary with a little broth or water. Taste. Correct seasonings. Remove thyme sprig before serving.
- Slice the turkey as desired. Serve with lemon gravy on the side.
Tutorial for Roasted Lemon-Thyme Turkey with Lemon Sauce
 Peel the onions, then slice them lengthwise into halves. Slice each half lengthwise into four or five thick pieces.
 Put the onion slices in the bottom of the baking pan. Place some of the lemon slices on top of the onions. Scatter the thyme around over the lemons and onions. Dot randomly with butter pieces.
<
p style=”text-align: center;”> If your turkey has a temperature gauge, take it out. You wont’ be needing it. The best way to monitor temperature when baking a turkey is to test the temperature in the thickest, meatiest part of the thigh with a standard meat thermometer.
<
p style=”text-align: center;”> Yes, it does leave a hole, but that is no big deal. Remember to also remove the neck and giblets from the turkey at this same time. Rinse the turkey, inside and out, under cool running water.
 Place the turkey breast side down on a cutting board.
 Remove the backbone with a good pair of kitchen shears. Start cutting at the “tail” end of the turkey and just to the right of the spine. Cut parallel to the spine down the length of the turkey. Repeat on the left side of the spine.
 One side completed. One side to go. Why am I wearing a glove, you ask? Oh, that. Well, I cut myself with those sharp scissors and it seemed the prudent thing to do to put on a glove to keep my wound clean.
 Success! Save the back bone to flavor soup or stock along with the neck and giblets.
 Turn the turkey over, breast side up. The thighs and legs are a bit floppy without the support of the spine. This lady is very proper; keeps her knees together.
 The next step in this process is to flatten out the breast somewhat. It won’t go completely flat, but at this point, the breast is still intact and is keeping the bird too rounded. This process will most likely take two hands, if you are somewhat muscle and leverage challenged like me. So, using two hands, press against the breast until you hear or feel a snap. The cartilage will have separated from the breast bone (sternum). By the way, this is a good time to review your CPR skills, not that the turkey can be revived at this point. You’ll get a good work out and a feel for what it would be like to do chest compressions on a real person instead of one of those mannequins used in CPR classes. It is surprisingly tiring after only 30 compressions!!!!!
 Pat the turkey dry, both on the back and the front. I use paper towels for this so that I can simply throw them away. Every time I see my gloved hand in these pictures, I feel like I am at work. Although my gloves fit much better at work.
 Place the turkey over the onions, lemons, thyme, and butter in the baking pan. Make adjustments as needed to distribute the ingredients equally beneath the turkey. It doesn’t have to be perfect, but try to keep the majority of the aromatics under the turkey. Notice how the legs have changed position now that the bird is more flattened./
 This is the part where you get to practice your massage skills. Rub all of the turkey skin with butter. This will make the skin so beautiful while it is baking.
 The turkey and aromatics shifted while I was buttering the turkey. If this happens to you, simply push them back under the bird./
 Sprinkle salt over the turkey. I forgot to mention that the under side of the turkey ought to have been sprinkled with salt and pepper prior to being placed on top of the aromatics. Oops. If you didn’t get salt and pepper on the under side of the turkey, not to worry. It’s really not critical to the outcome because of all of the other flavors going on.
 Don’t forget the pepper.
 Place lemon slices and thyme sprigs randomly on top of the turkey. There is so much amazing flavor going on in this baking pan and from only a few simple ingredients!
 After baking, your turkey is going to look something like this. Gorgeous! Use an internal thermometer inserted into the meatiest part of the thigh to make certain that the turkey has reached 165 degrees F. For safety, the temp needs to be 165 degrees F, but you do not want to over-cook the turkey by cooking past the 165 degree mark. The longer the turkey bakes past that mark, the drier the meat becomes. Allow the turkey to rest in the pan for about 10 minutes. This gives the juices time to redistribute./
 Remove the turkey from the pan and set aside on a cutting board. There are some incredible flavors in the bottom of this pan. Remove the lemons and thyme and discard. The onions can be served as part of the meal or discarded. I was about to toss them, but my husband insisted that I save them for him. He said that they were delicious!
 Reserve all of the cooking juices. Add enough chicken stock to bring the juices up to two cups, then pour the liquid into a sauce pot. In a small bowl, mix together the corn starch with some additional stock until smooth. Add it to the pot. Squeeze the juice from the remaining lemon half and add it to the liquids in the sauce pot. Bring to a boil, cook and stir until gravy has thickened. Serve as a side for the turkey.
 Slice the turkey as desired. This picture shows the beautiful, golden skin and the moist, tender white meat. The flavor is light, fresh, and full; perfect for a Springtime meal.
/
You may also like:

Fruit and Juice Brined Turkey

Arroz Con Pollo

Creamy Mushroom Chicken Over Linguini
You are such a kitchen rockstar!!! Serious?! You make up a recipe, then you create it, and photograph it like a pro. I’m completely impressed. And drooling! This looks fabulous!!
Carol, hi! It’s so good to hear from you. You always make me laugh. Laughter is good for the soul.
Agreed! We always have a good laugh. Usually at 3 in the morning too. I do think that the later it is, the more giddy I get. You too? I loved getting your comments. I’ve been gone for spring break but came home today to 2,642 spam comments and 2 real ones. Yours! Thank you. I’ve got to do something about spam, I think. Every blogger’s nightmare, right? Well, you are such a sweet friend. I went on and on in my reply to your “smoking” comment. You totally made me laugh!!
Terri, that’s a beautiful turkey. Heck even the picture of it raw dressed with the lemons is so beautiful. I love the flavors of lemon and thyme together. A definite winning meal.
Thanks Ramona! You are always so gracious to drop by and leave nice comments.
Hi Terri – I love this recipe and can’t wait to try it. Just one question, have you ever brined your turkey prior to cooking with this recipe? Do you have any suggestions on this or reasons why I shouldn’t? Thanks!
Hi Etani. A brined turkey would work great with this recipe; I was just thinking about it a few days ago, too. The only thing I would change would be the gravy; you should probably use all chicken broth to make the gravy instead of chicken broth and reserved cooking juices. It’s been my experience that the juices from a brined turkey are salty.
By the way, if you don’t already have a favorite brine that you are using, I have one on this site. It is fruit juice based and I think that it would be complimentary to this recipe. If you are interested, here is the link https://tsgcookin.com/2011/11/fruit-and-juice-brined-turkey/. Have a great Thanksgiving and drop back by to let me know how your turkey turned out. ~Terri
Thanks, Terri! Really appreciate the advice for gravy and I am planning to try this on Thursday with a brined turkey. Probably going to go with a simpler brine because I won’t have a lot of time tomorrow to prep, but the fruit juice based one sounds delicious for another holiday dinner, maybe even Christmas! I’ll be sure to report back on how it all turns out. Thanks again and enjoy your Thankgiving.